This guide is designed for complete newcomers to cryptocurrency. If you've never used crypto before and just want a simple way to make purchases on our website, we'll keep things straightforward. No technical jargon overload — just the basics to get you set up quickly and safely.
Why Use Cryptocurrency?
Payment gateways (Stripe, Mollie, local processors, etc.) have no autonomy – they must instantly obey orders from banks and most popular payment cards processors. These institutions are becoming aggressively censorious, blocking payments for ever more trivial and far-fetched reasons. They will grasp at any excuse – no matter how flimsy – to label something “controversial” or “high-risk” and shut it down overnight.
Our content has been unacceptable to them from the very beginning. Even if a gateway wanted to work with us, it could be ordered at any moment to “kill this merchant” – and it would have no choice but to comply immediately. We refuse to be taken down any time and let your access depend on the whims of corporations and banks that block anything they personally dislike.
How do traditional payment methods compare to cryptocurrencies?
| Traditional payments (bank, Visa, Mastercard, PayPal) |
Cryptocurrency (SOL, BTC, ETH, USDC etc.) |
|---|---|
| Can block or freeze your account for political, ideological or “risk policy” reasons (happens regularly) | Nobody can freeze your wallet – as long as you hold your keys, your money is 100% yours |
| Knows exactly who you are, where you spend, and can share that data with governments or corporations | Your name is not attached to every transaction – the shop sees only your wallet address, not your ID |
| Can reverse transactions or demand refunds weeks later | Transactions are final – once paid, it’s done (great for sellers, fair for honest buyers) |
| Can refuse service because of your country, beliefs, or the type of product | Works everywhere in the world for anyone with internet – no discrimination |
And that’s exactly why we accept crypto. We don’t want to be forced to reject customers because a bank or payment processor disagrees with what someone buys or believes. For us it's also not being suddenly left by payment processor only because some institution or company doesn't like the content. We were experiencing it in the past. Effects are obvious - we have no funds to run website anymore and it's hard to find someone who will be processing it. Not mentioning time to implementat new processor
The entire platform has been built from the ground up to be as independent as possible – our own infrastructure, our own technical solutions letting us change providers easily and minimizing dependency on third party solutions. Cryptocurrency is just one piece of this broader independence strategy:
1. What Do You Need to Use Cryptocurrency as a Payment Method?
To pay with crypto, you'll need a crypto wallet. Think of it as a digital version of your physical wallet, but for storing and sending cryptocurrencies instead of cash or cards. There are 2 types of crypto wallets:
- Hot wallets: Online apps (usually on your phone). Convenient for everyday use since transactions happen quickly.
- Cold wallets: Offline devices (like USB sticks). More secure, but slower for payments.
Tip: Start with a hot wallet if you're new—it’s easier and faster for beginners.
Which Crypto Wallet to Choose for Fast Transactions?
If you want to pay instantly – whether in online shops, games, DeFi, NFT marketplaces, or even some physical stores – hot wallets (online/mobile wallets) are by far the best choice. Here’s why they beat cold/hardware wallets for everyday fast payments:
- Always connected to the internet – no need to plug in a device or scan a QR code from another wallet.
- One-tap or biometric approvals – confirm transactions in 1–2 seconds with Face ID, fingerprint, or a simple swipe.
- Direct integration with dApps, browsers (via WalletConnect or browser extensions), and payment gateways.
- Instant access to funds – perfect for topping up accounts, buying NFTs the moment they drop, or paying at crypto-friendly checkouts.
- Works everywhere you are – on your phone, tablet, or browser, 24/7.
In short: hot wallets = speed and convenience. Cold wallets are for long-term HODLing and maximum security, but they are simply too slow and clunky when you need to pay or interact in seconds.
Here are the best hot wallets in 2025 for lightning-fast transactions:
- Zengo: Most secure for beginners | No seed phrase (keyless MPC) | Zero hacks ever | Free core version.
- Exodus: Beautiful interface | Desktop + mobile | 300+ cryptos | Built-in swaps | 100% free.
- MetaMask: Must-have for Ethereum, Base, Polygon & DeFi | Browser-first | Thousands of tokens & NFTs | Free.
- Phantom: Lightning-fast multi-chain (Solana + Ethereum + Bitcoin + Polygon + Base + Sui) | Perfect for NFTs & DeFi | 100% free.
- Trust Wallet: Best mobile-first wallet | 100+ chains & 10M+ tokens | Official Binance wallet | Super fast | Free.
Just download one from your app store (or add the browser extension), set it up with email/phone + biometrics, and you’re ready to pay or trade in seconds – anywhere, anytime.

2. Where and How to Purchase Cryptocurrency?
Buying crypto for the first time is easier than ever, but there are a few practical things you should know so you’re not caught off guard.
The easiest method (recommended for 95% of beginners)
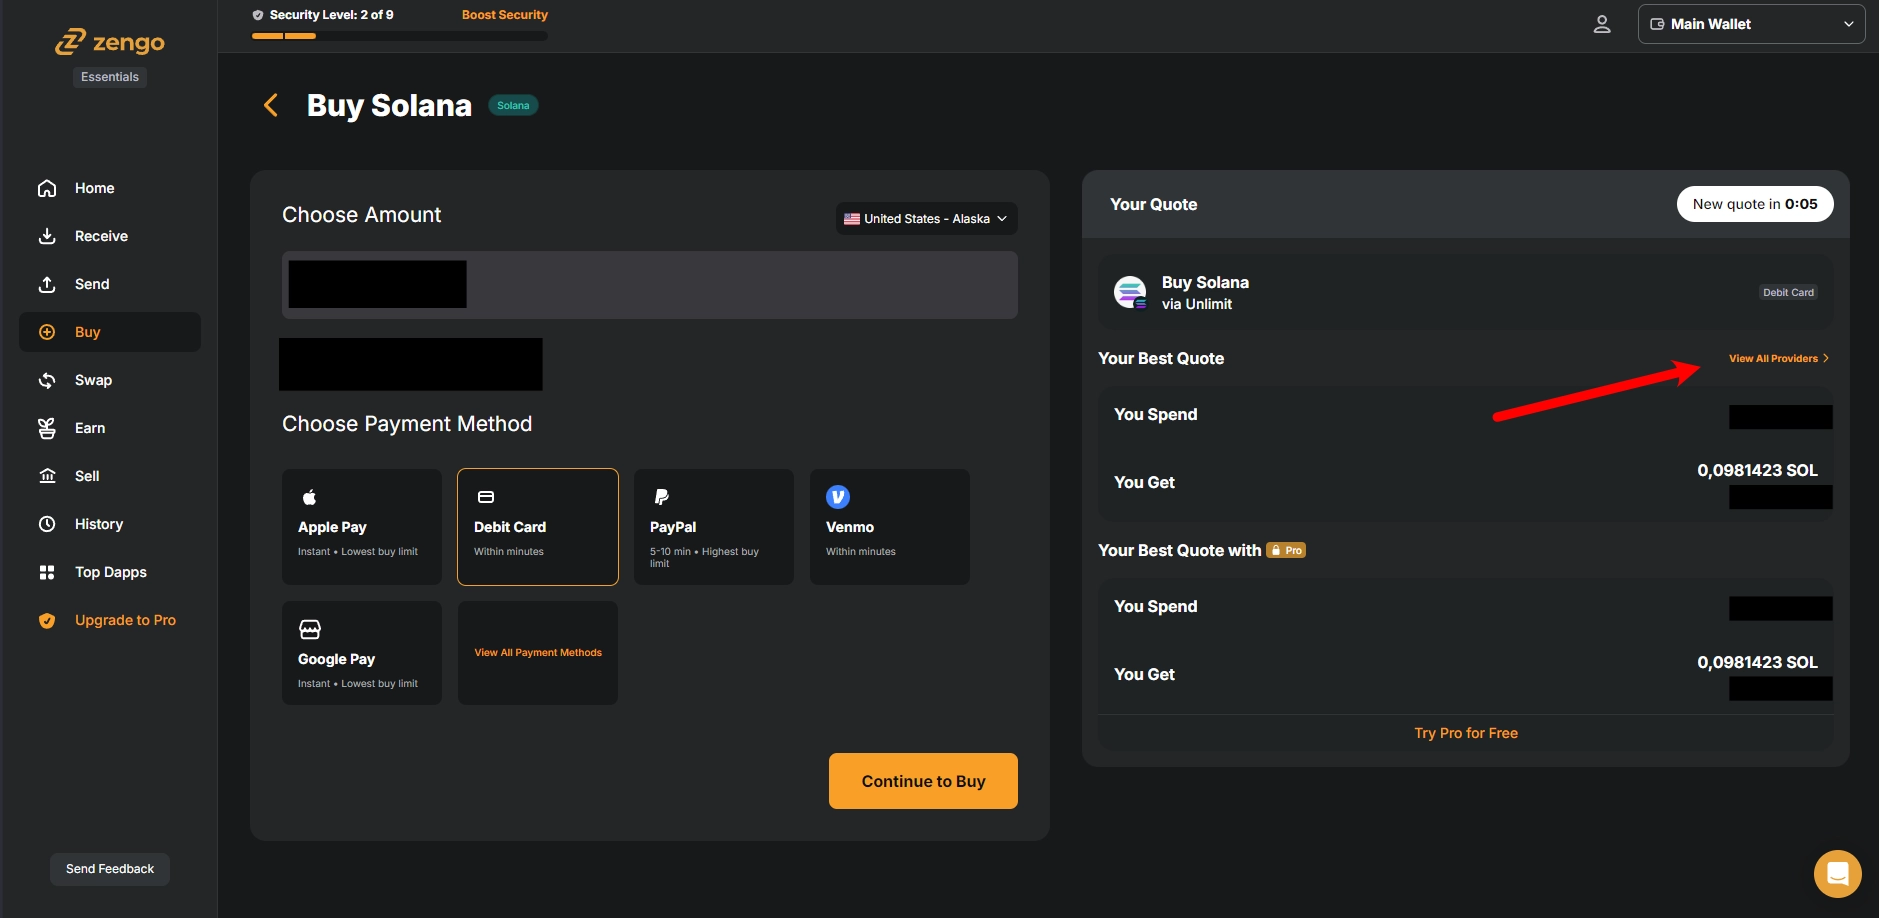
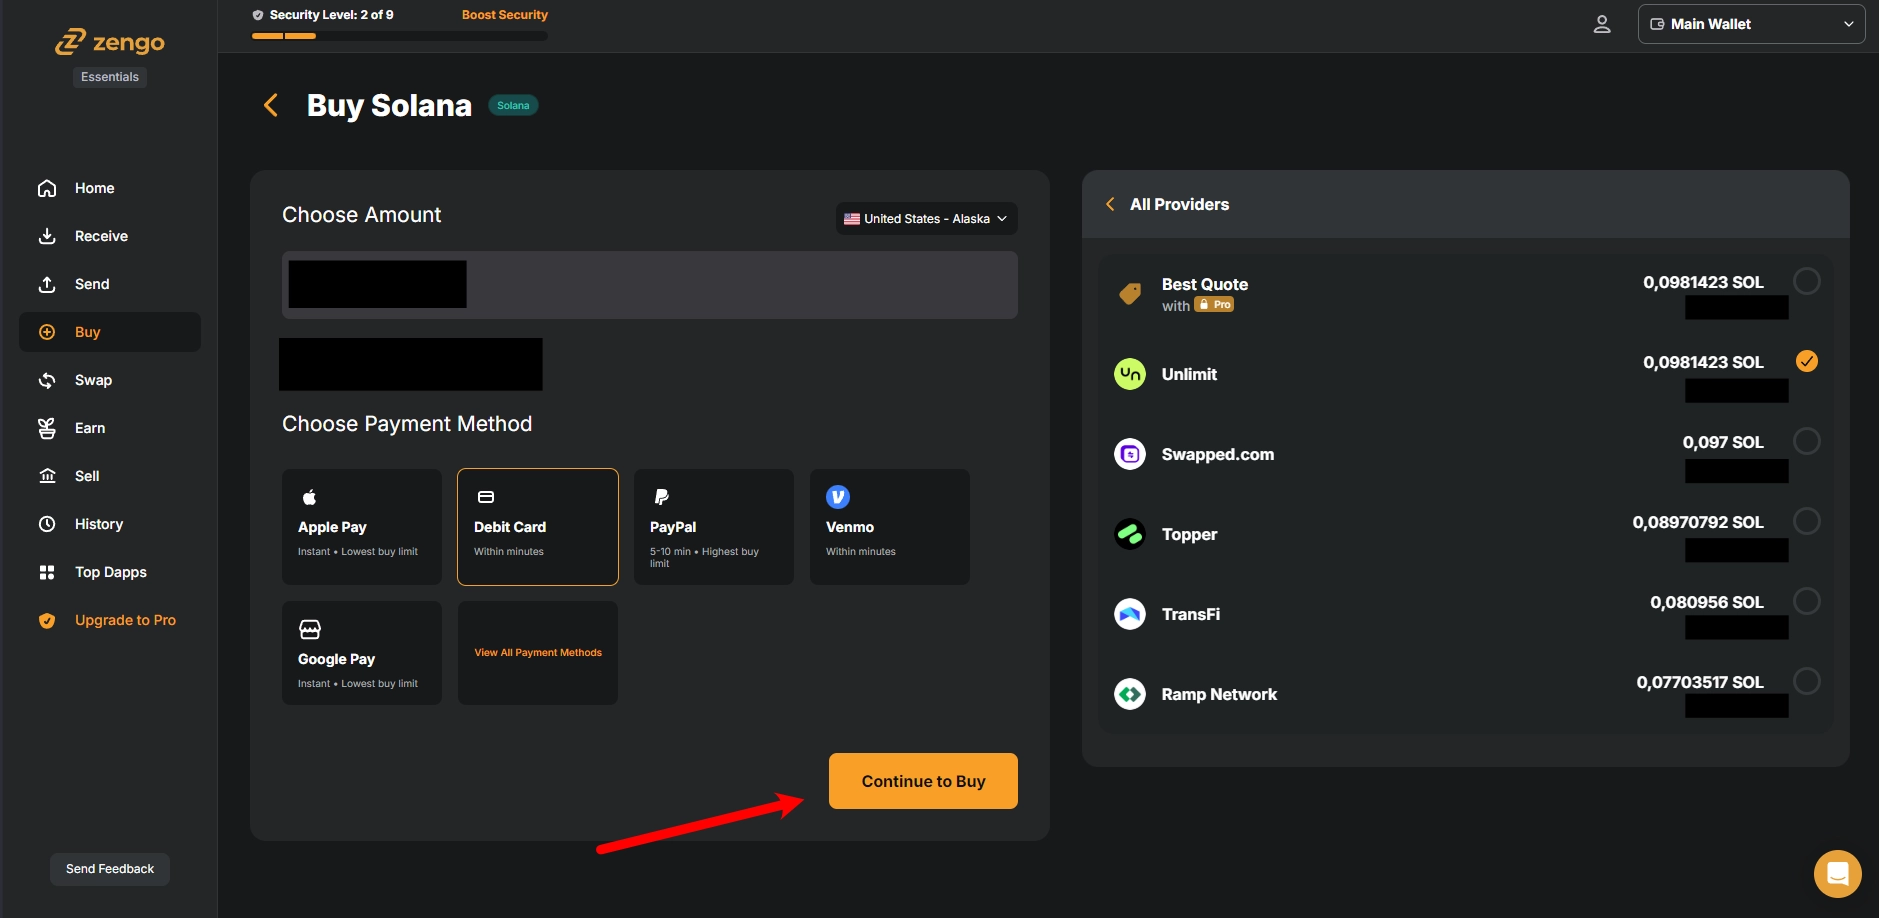
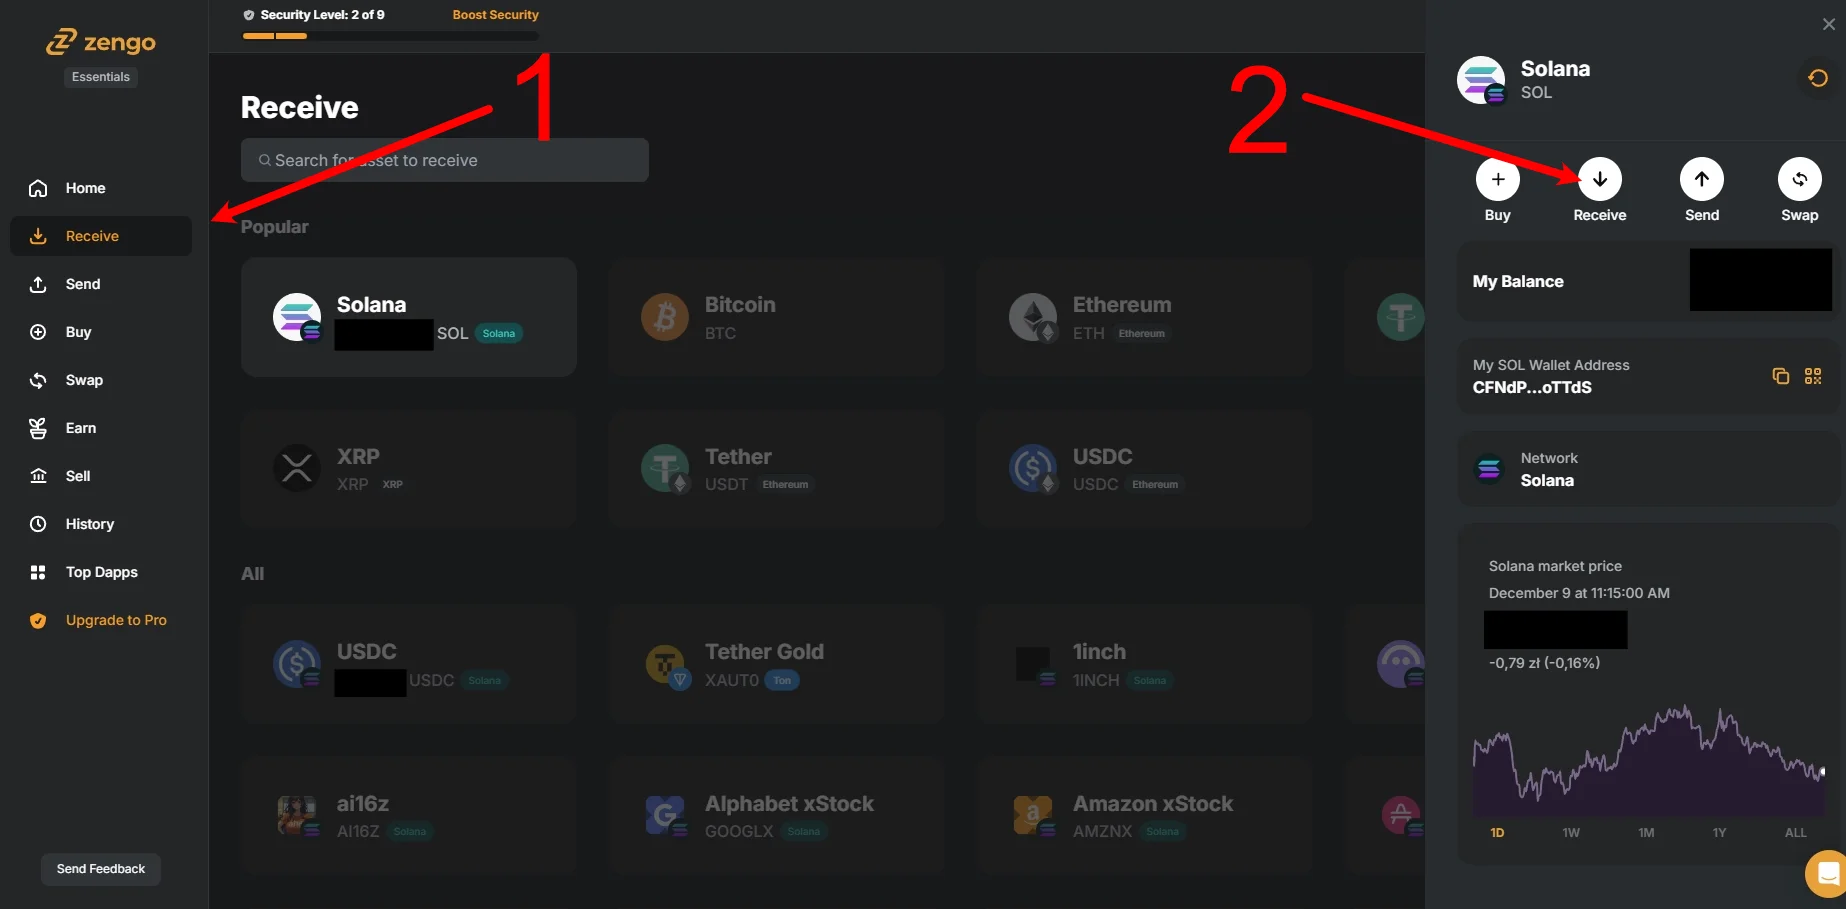
Buy directly inside your crypto wallet app.
Open the app → Choose the cryptocurrency → Enter the amount in your local currency → Pay with card, Apple Pay, Google Pay, or bank transfer.
And that’s literally it!
The money usually lands in your wallet within 1–10 minutes. Later in this guide we’ll show you step-by-step screenshots of how it looks on our site too.
What to expect when buying?
For small amounts (limits depend on the provider) you usually only need to enter:
- name
- address
No ID photos or selfies required.
Fees are a bit higher, but everything happens in one place and is extremely simple. About 95% of first-time purchases go through instantly. In rare cases the transaction is flagged for manual review — you’ll get an email and may need to wait 24–48 hours. It happened to me once on Transfi, but it can happen anywhere depending on platform.
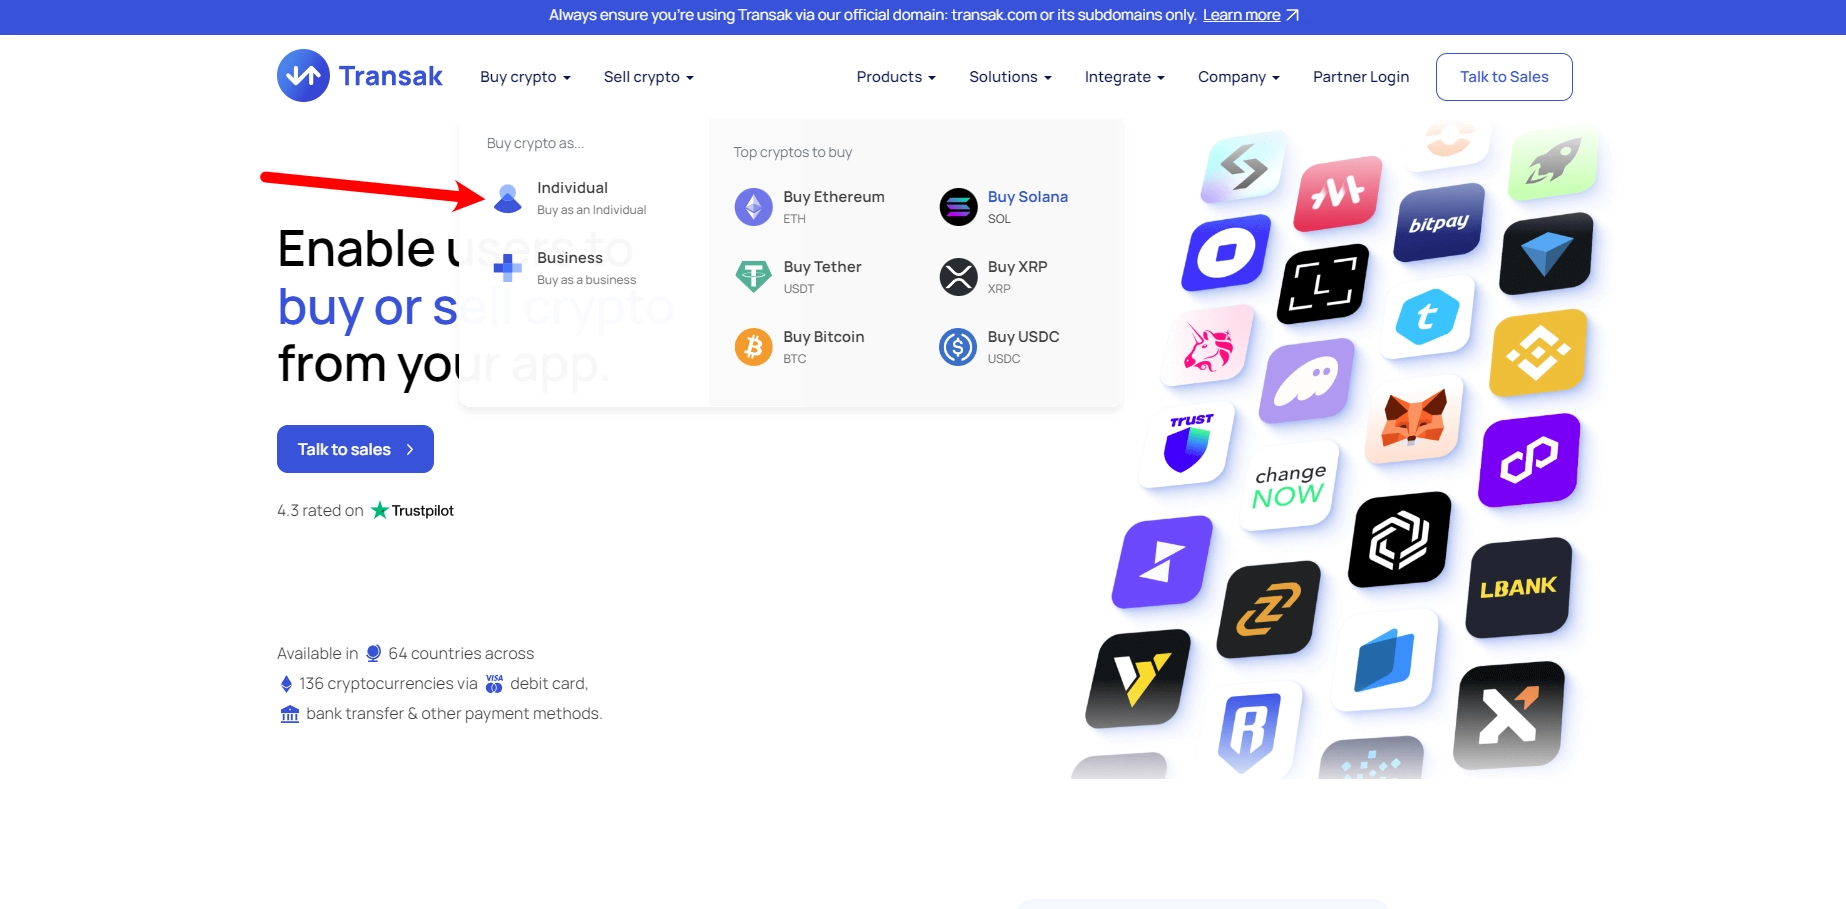
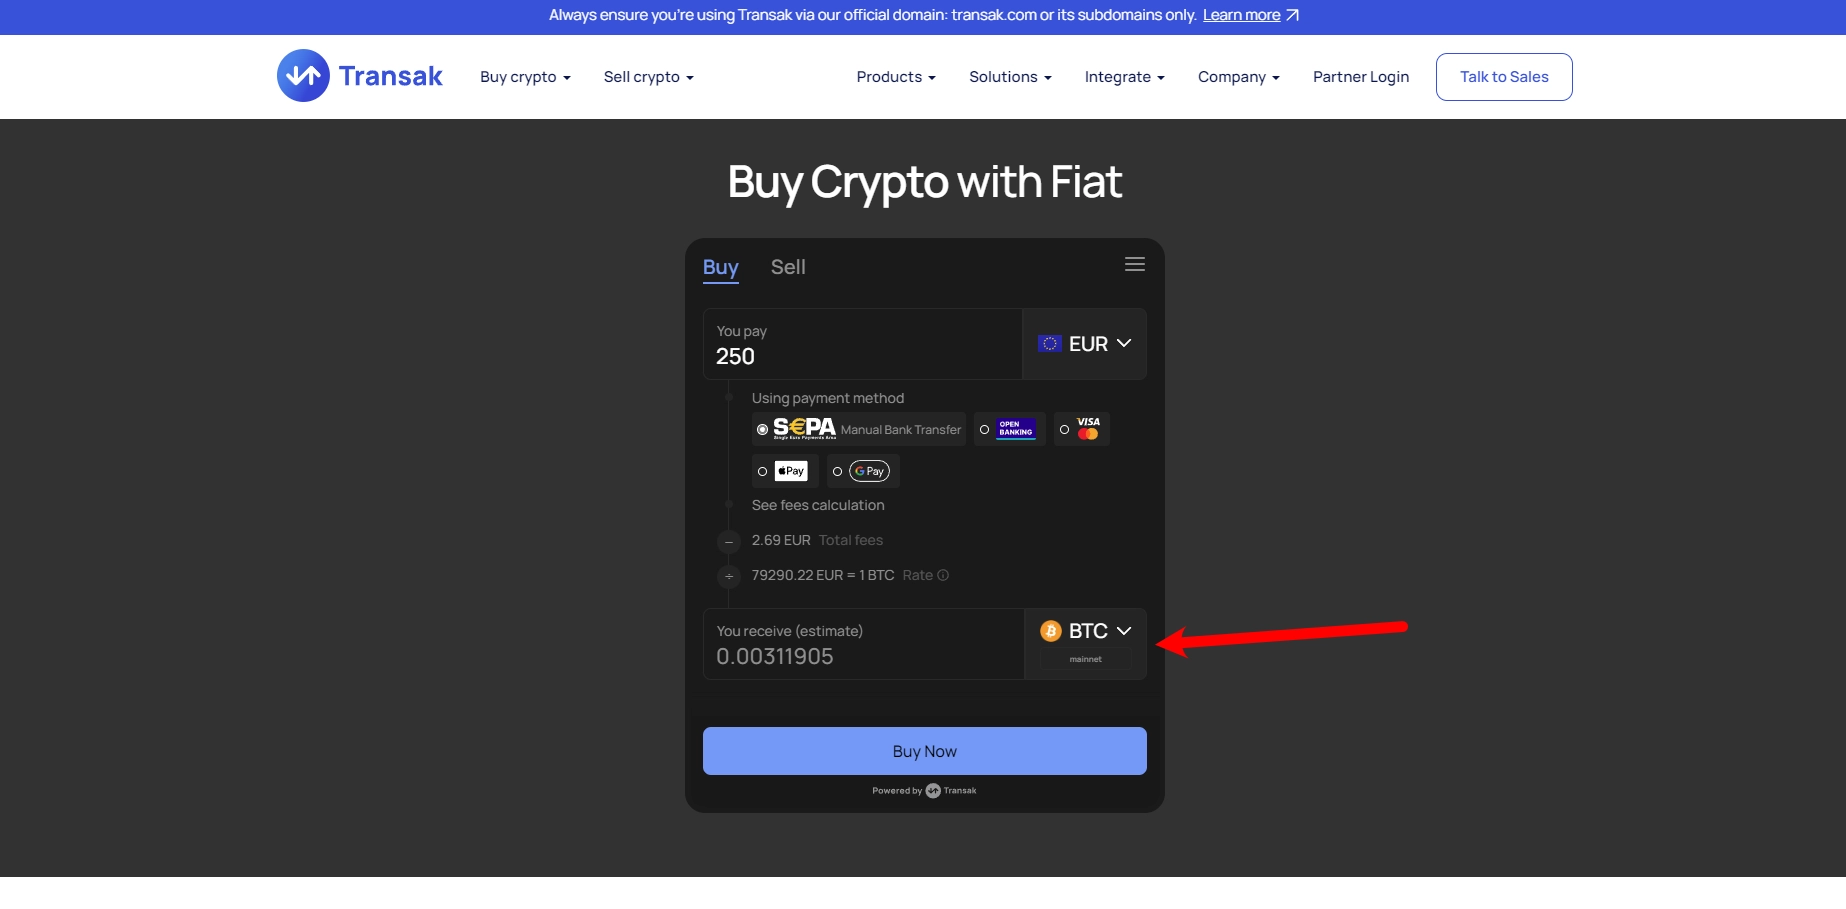
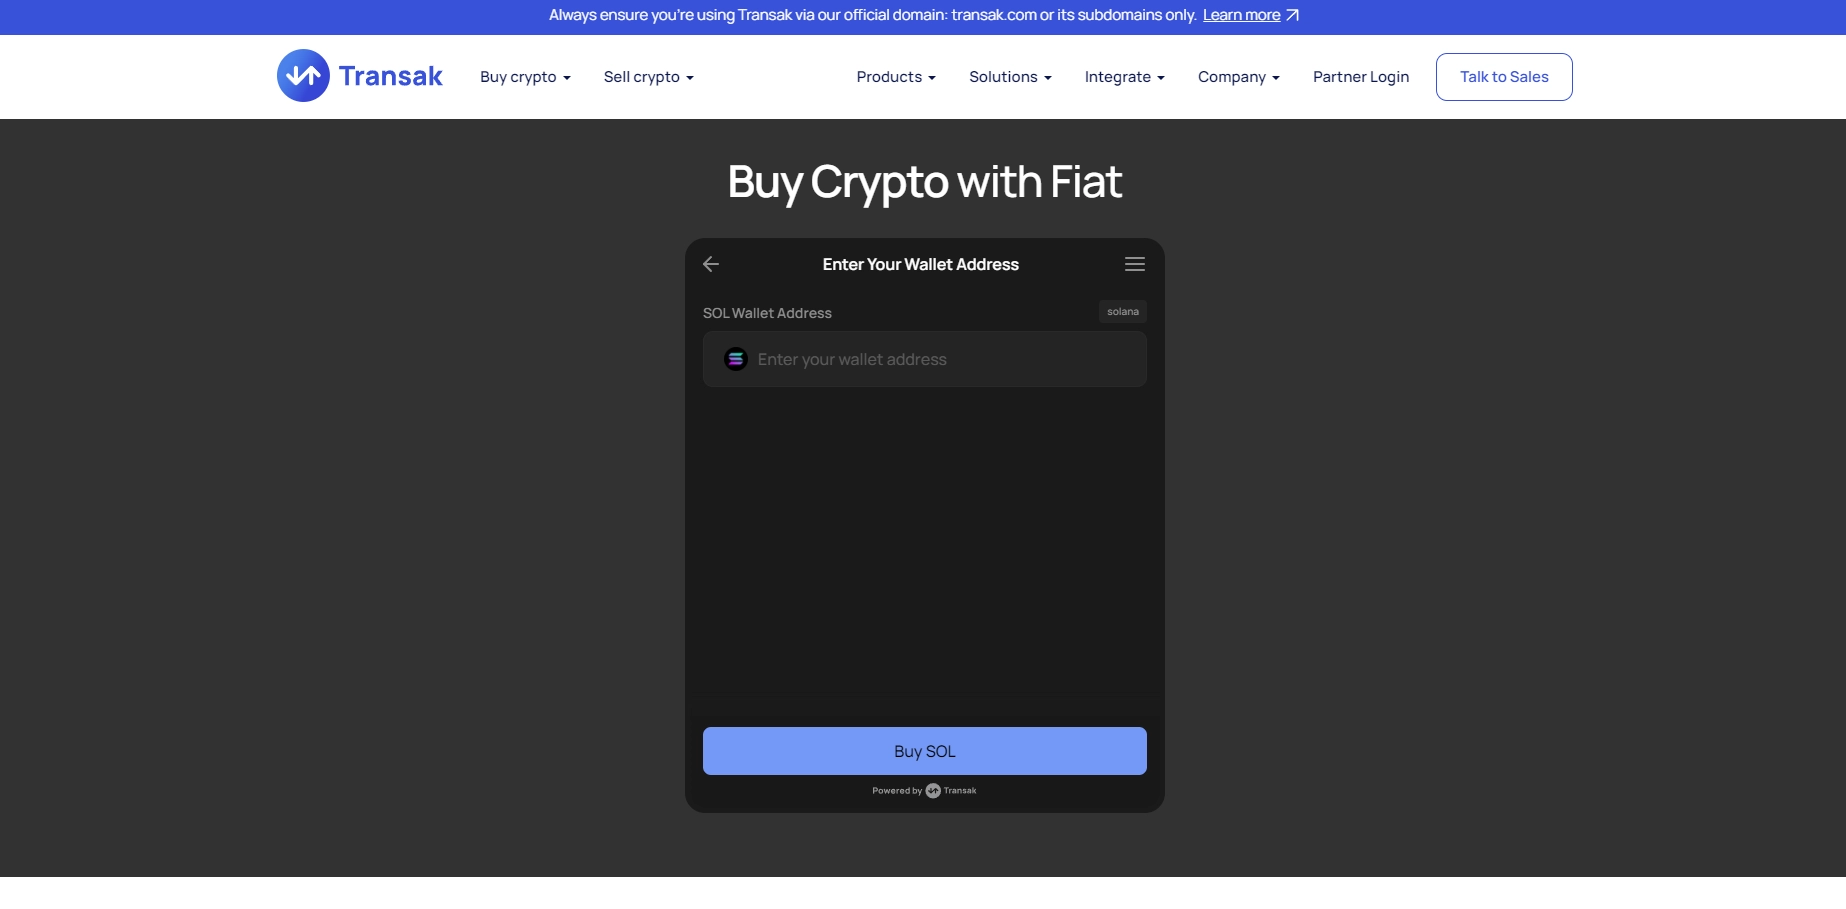
If you want to avoid sending any document photos at all (even for small amounts), try transak.com or transfi.com — both send crypto straight to your wallet address. I’ve personally used Transak many times with only very light KYC (no passport photo or selfie needed for purchases under a few hundred euros/dollars).
Quick decision guide — which method should you choose?
- Just want it to work instantly and as easily as possible?
→ Use the built-in “Buy Crypto” feature in your wallet (e.g. Zengo, Trust Wallet, MetaMask, etc.). - Want the absolute cheapest fees and you’re buying a small/medium amount?
→ Use a third-party on-ramp like Transak, Transfi, MoonPay, Ramp, etc. - Don’t mind a few extra steps for the lowest possible price?
→ Register on a traditional exchange like Binance or Coinbase, complete full KYC once, then buy and withdraw.
No matter which option you pick — as soon as the crypto lands in your wallet, you’re 100% ready to pay or send. Just scan a QR code or paste the address and you’re done!
In the next sections we’ll walk you through both methods with real screenshots:
• Built-in purchase example based on Zengo
• Buying via Transak
so you can follow along exactly, step by step if you need.

3. Which Cryptocurrency Is Best for Quick Transactions?
If you just want to send or spend money fast and cheaply in the crypto world, here are the real best options — explained step by step so you never get an unpleasant surprise.
The two main situations you will encounter
A. You buy crypto → spend or send it immediately (within minutes or hours)
B. You keep the money in crypto for weeks, months or years and only spend it later
Situation A: “Buy now, spend now” (the simplest way)
If you plan to spend everything right away, buy the native coin of a fast network directly. Why? Because you don’t need to hold two different coins — the coin you send is the same one that pays the fee.
Best choices (all have extremely low fees and near-instant confirmation):
- Solana (SOL)
- Stellar (XLM)
- Ripple (XRP)
- Tron (TRX)
- Nano (NANO) – completely free and instant
Example: You want to send $200 to a friend today.
You buy $200 worth of SOL on an exchange, withdraw it to your wallet, and send it — done. No second coin, no surprises, almost zero fee.
Situation B: You want stable value (you hate price swings)
Use stablecoins such as USDC, USDT, DAI, etc. They are perfect when you want the money to stay worth exactly the same tomorrow, next month or next year.
Very important rule you must remember:
Stablecoins are tokens that live on someone else’s blockchain. To move them you always need a tiny amount of the native coin of that blockchain to pay the fee.
Real-life examples:
- USDC on Solana → you need ~$2–3 in SOL in the same wallet
- USDT on Tron → you need a few cents in TRX
- USDC on Polygon → you need a little POL
- USDC on Stellar → you need ~$0.50 in XLM
If you forget the native coin, your transaction will be stuck forever. Always keep a small buffer of the base coin.
Quick summary – what to choose when
- Just want to make a quick purchase and spend it all at once?
→ Buy a native low-cost cryptocurrency: SOL, XLM, XRP, TRX or Nano. No extra coin needed. - Want to keep money for weeks/months/years and spend later with the same value?
→ Use a stablecoin (USDC or USDT) but always keep a small amount of the native currency for fees (e.g. SOL for USDC on Solana).
Happy (and cheap) transacting!
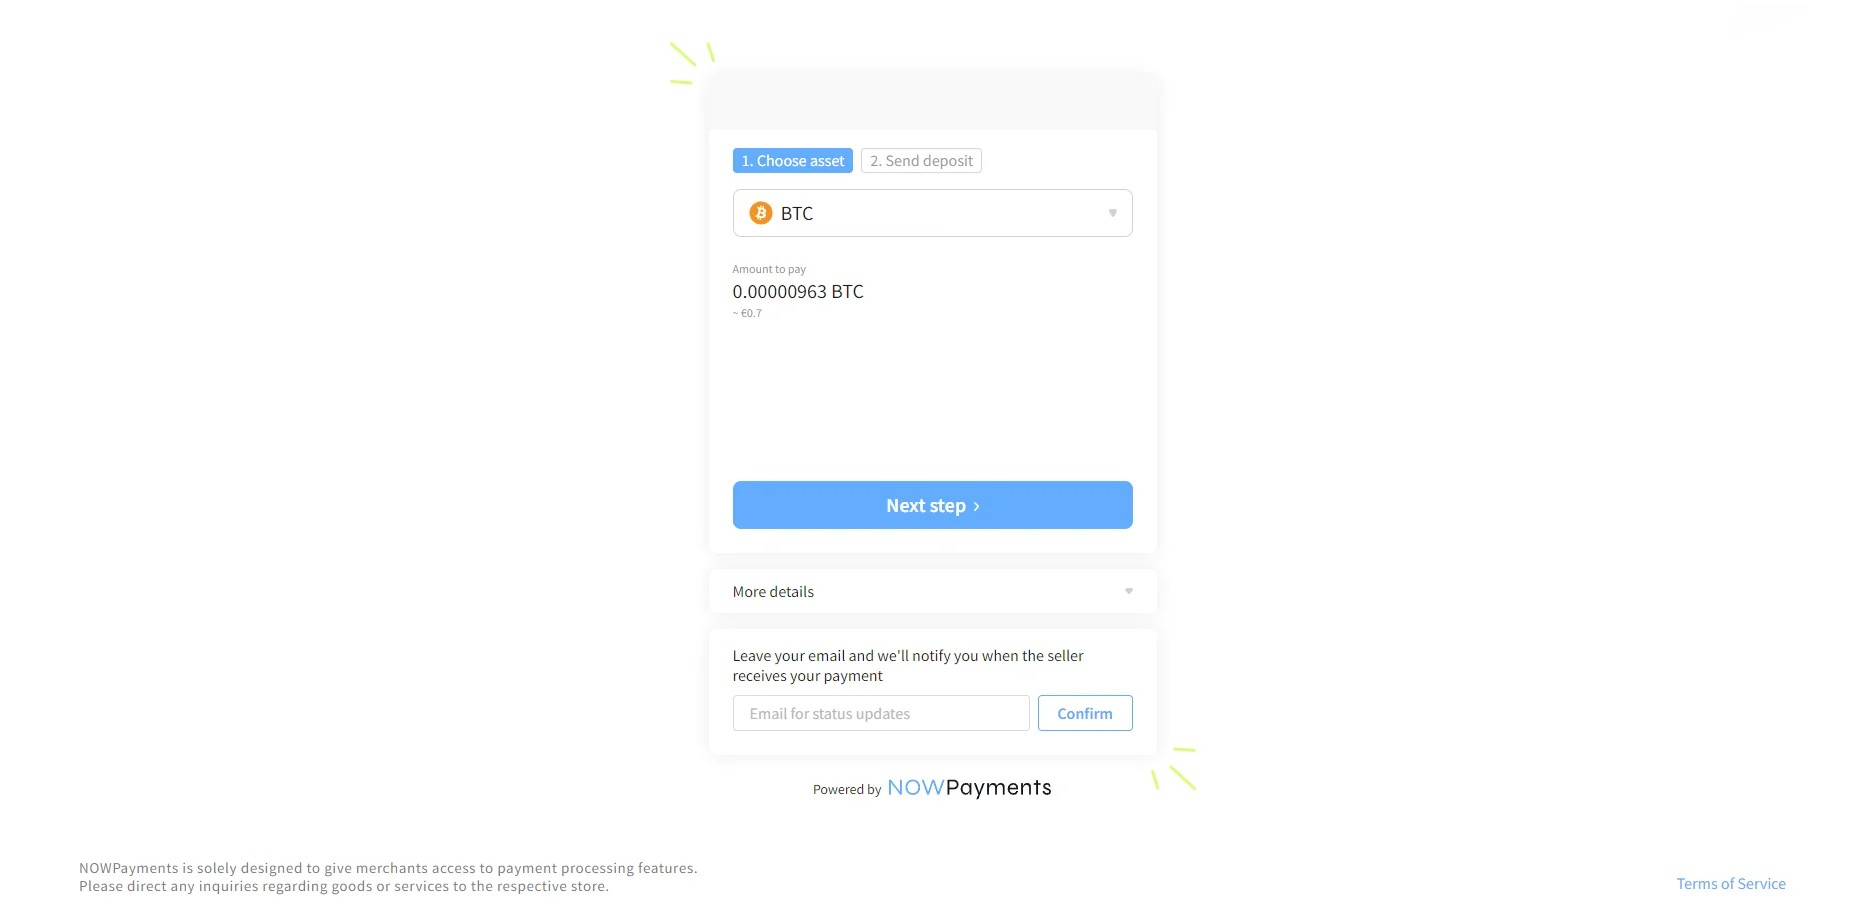
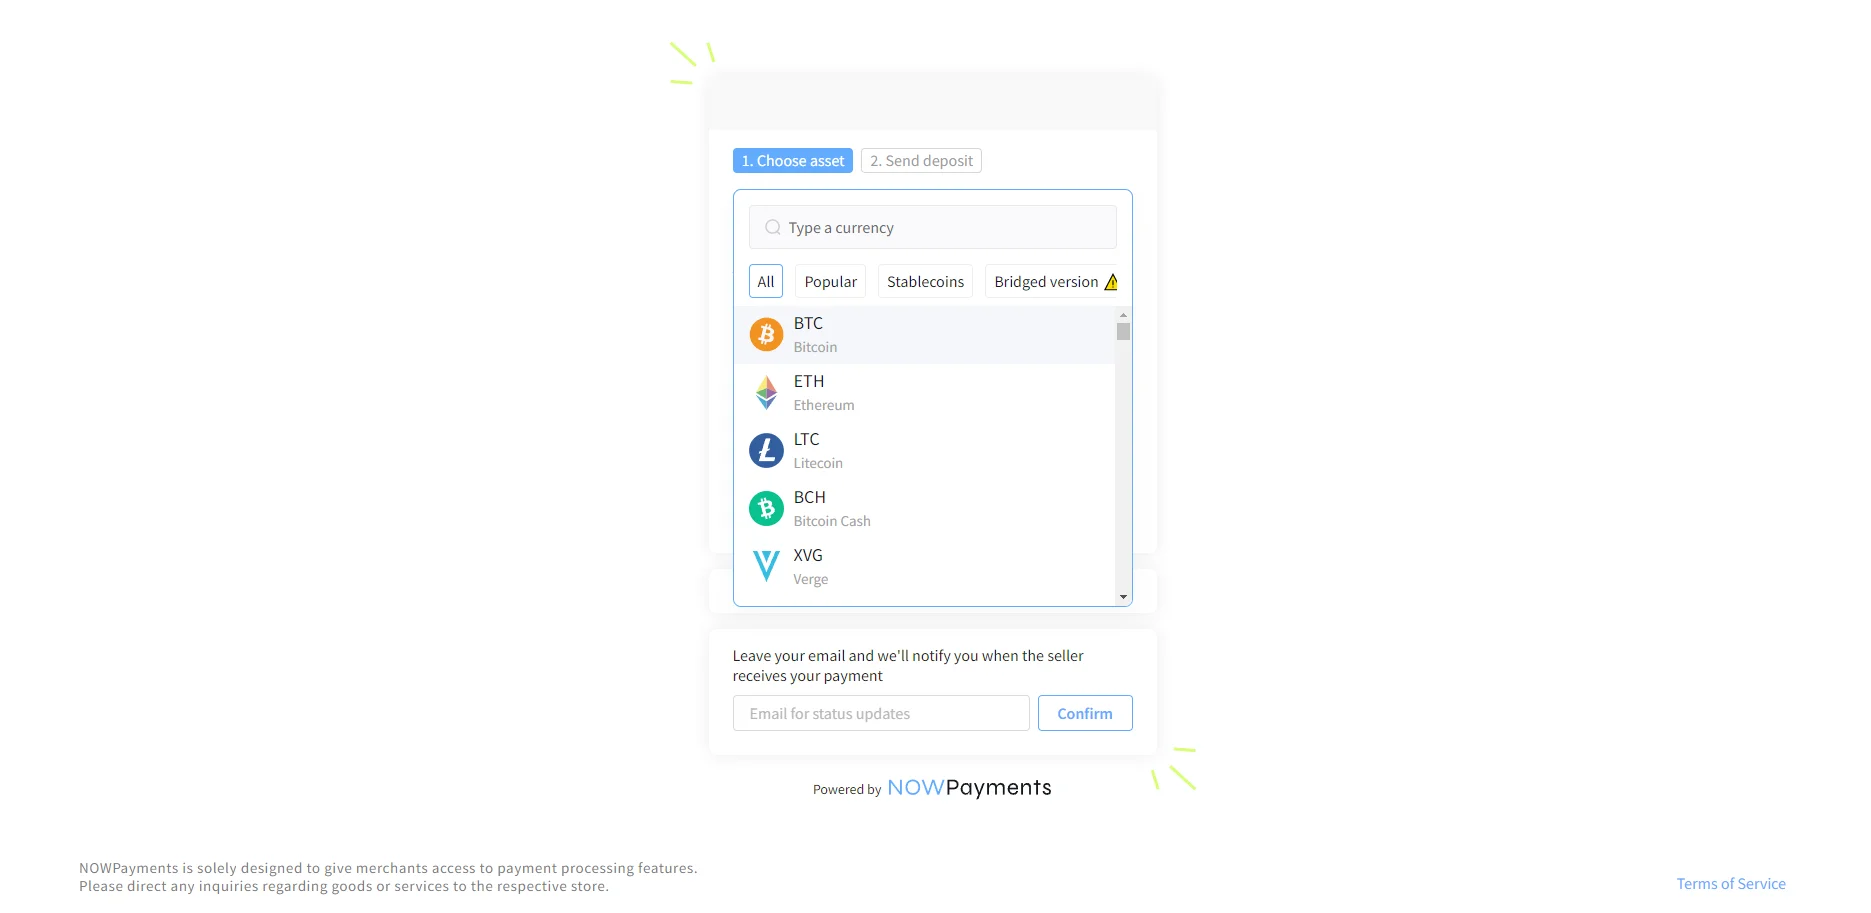
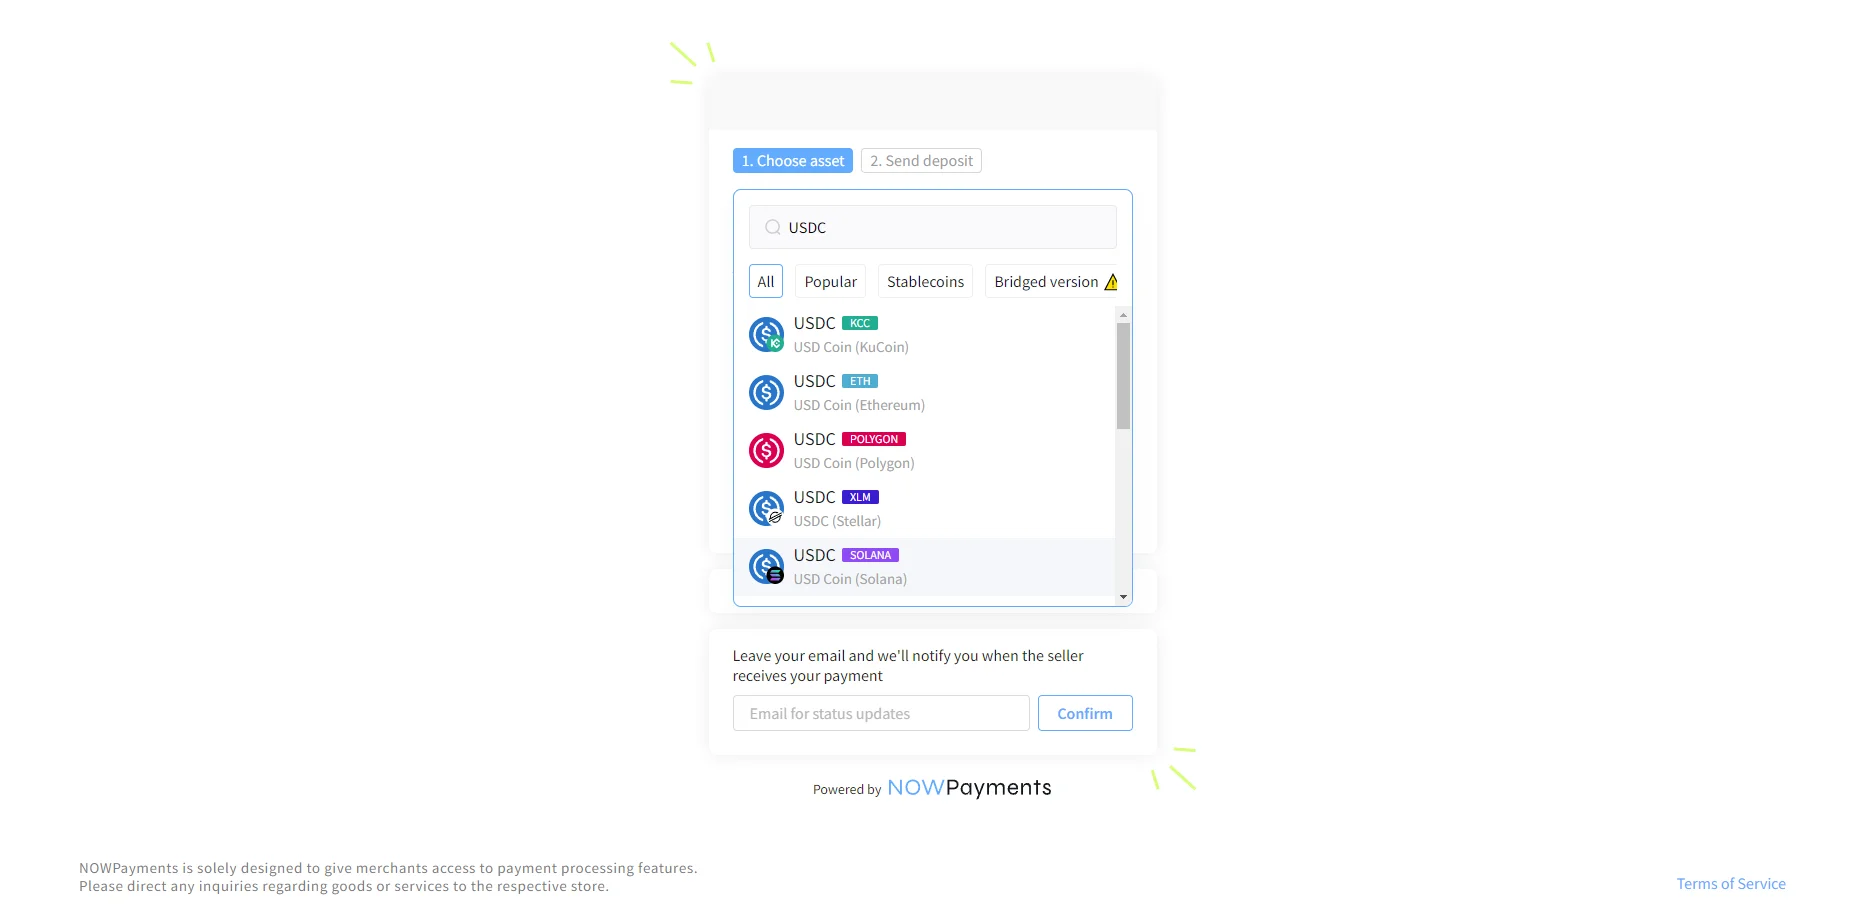
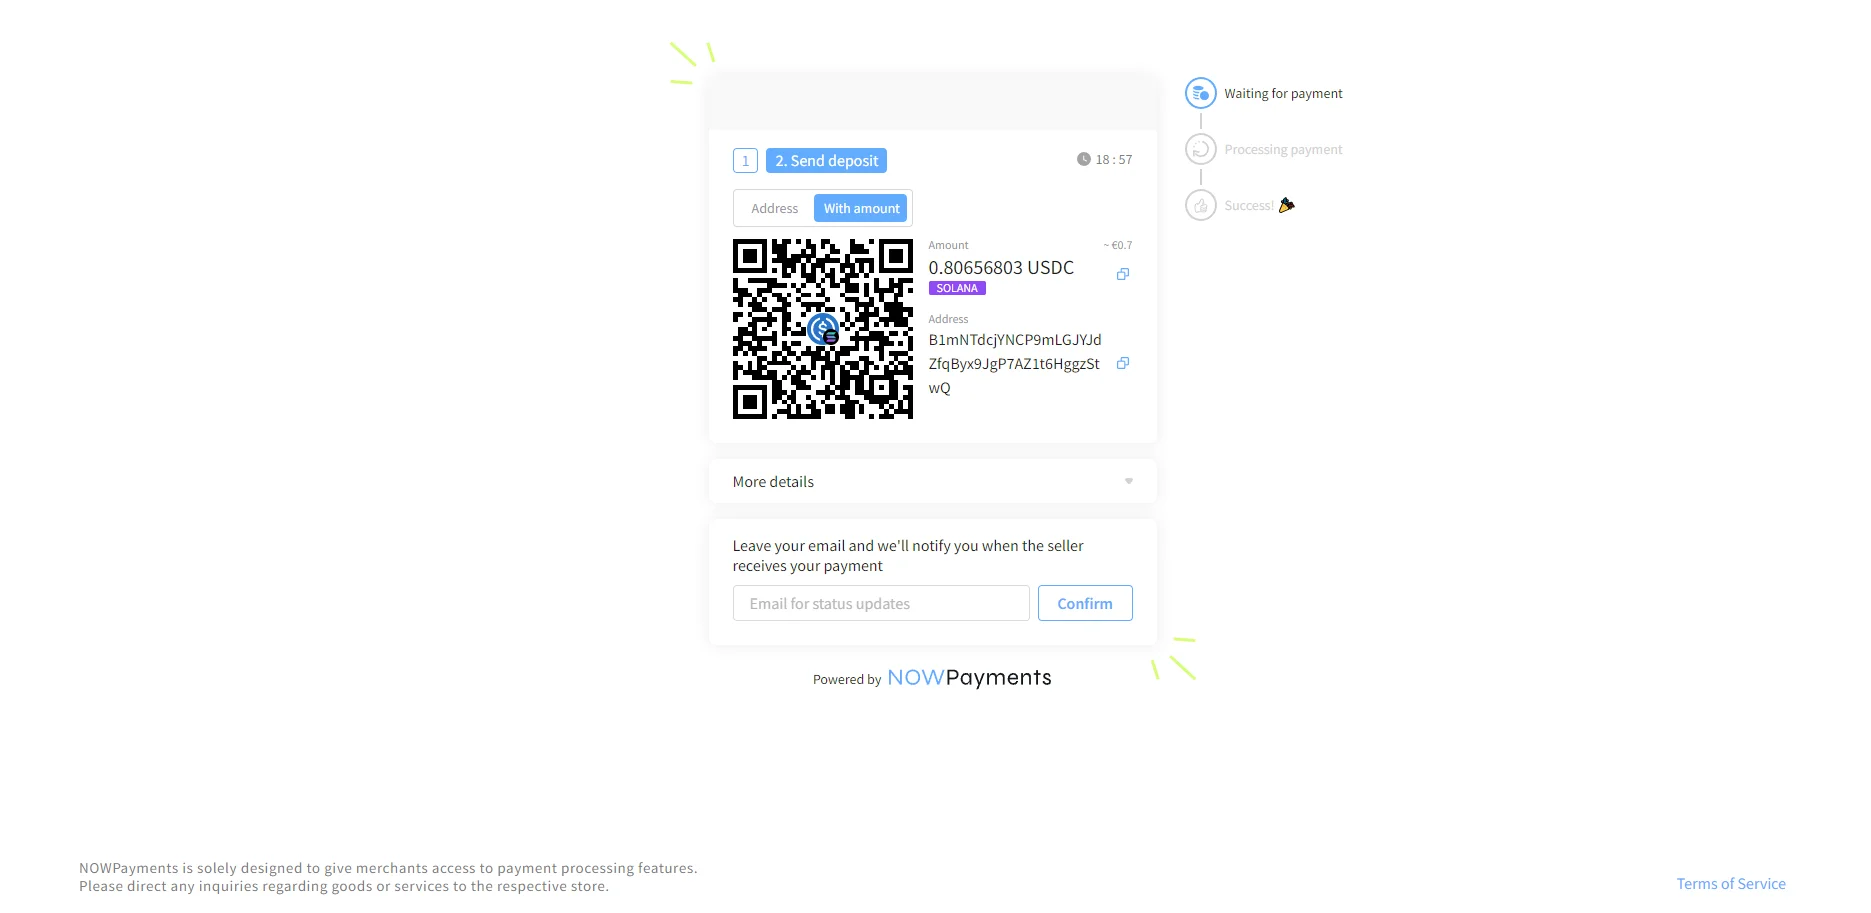
First of all, to make a purchase on our website, you need to buy cryptocurrency first. You can begin the checkout process to see the list of supported cryptocurrencies. Below, you will find step-by-step guides on how to purchase cryptocurrency based on selected examples.
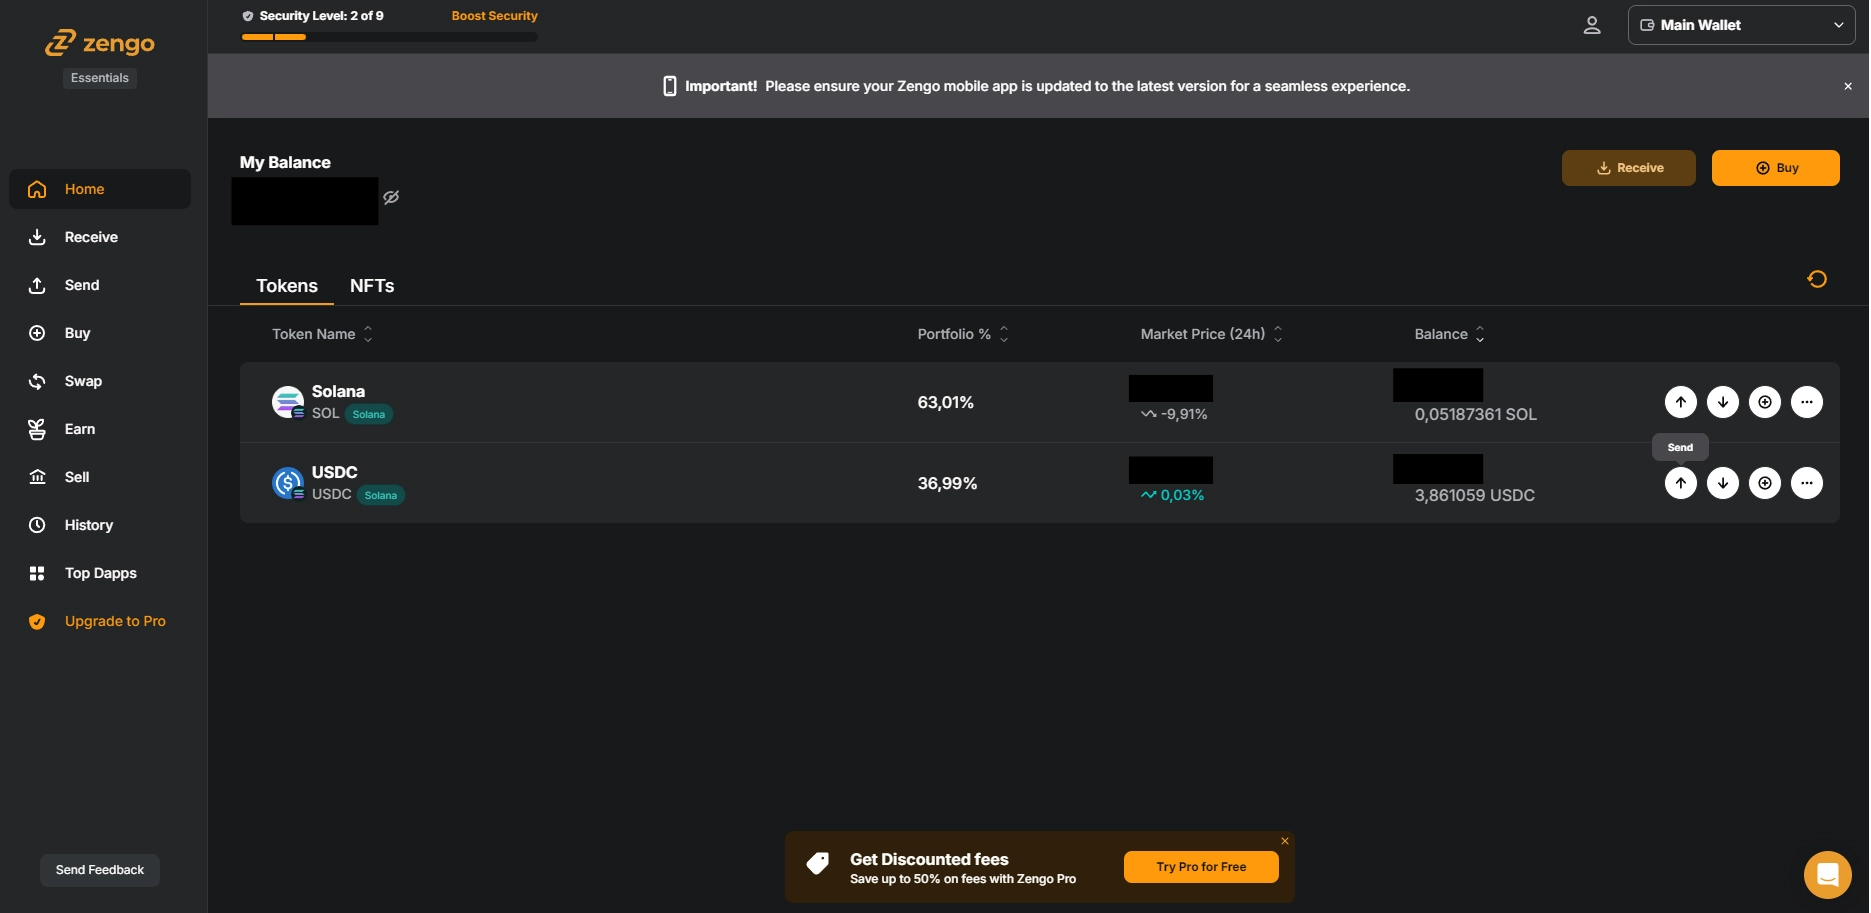
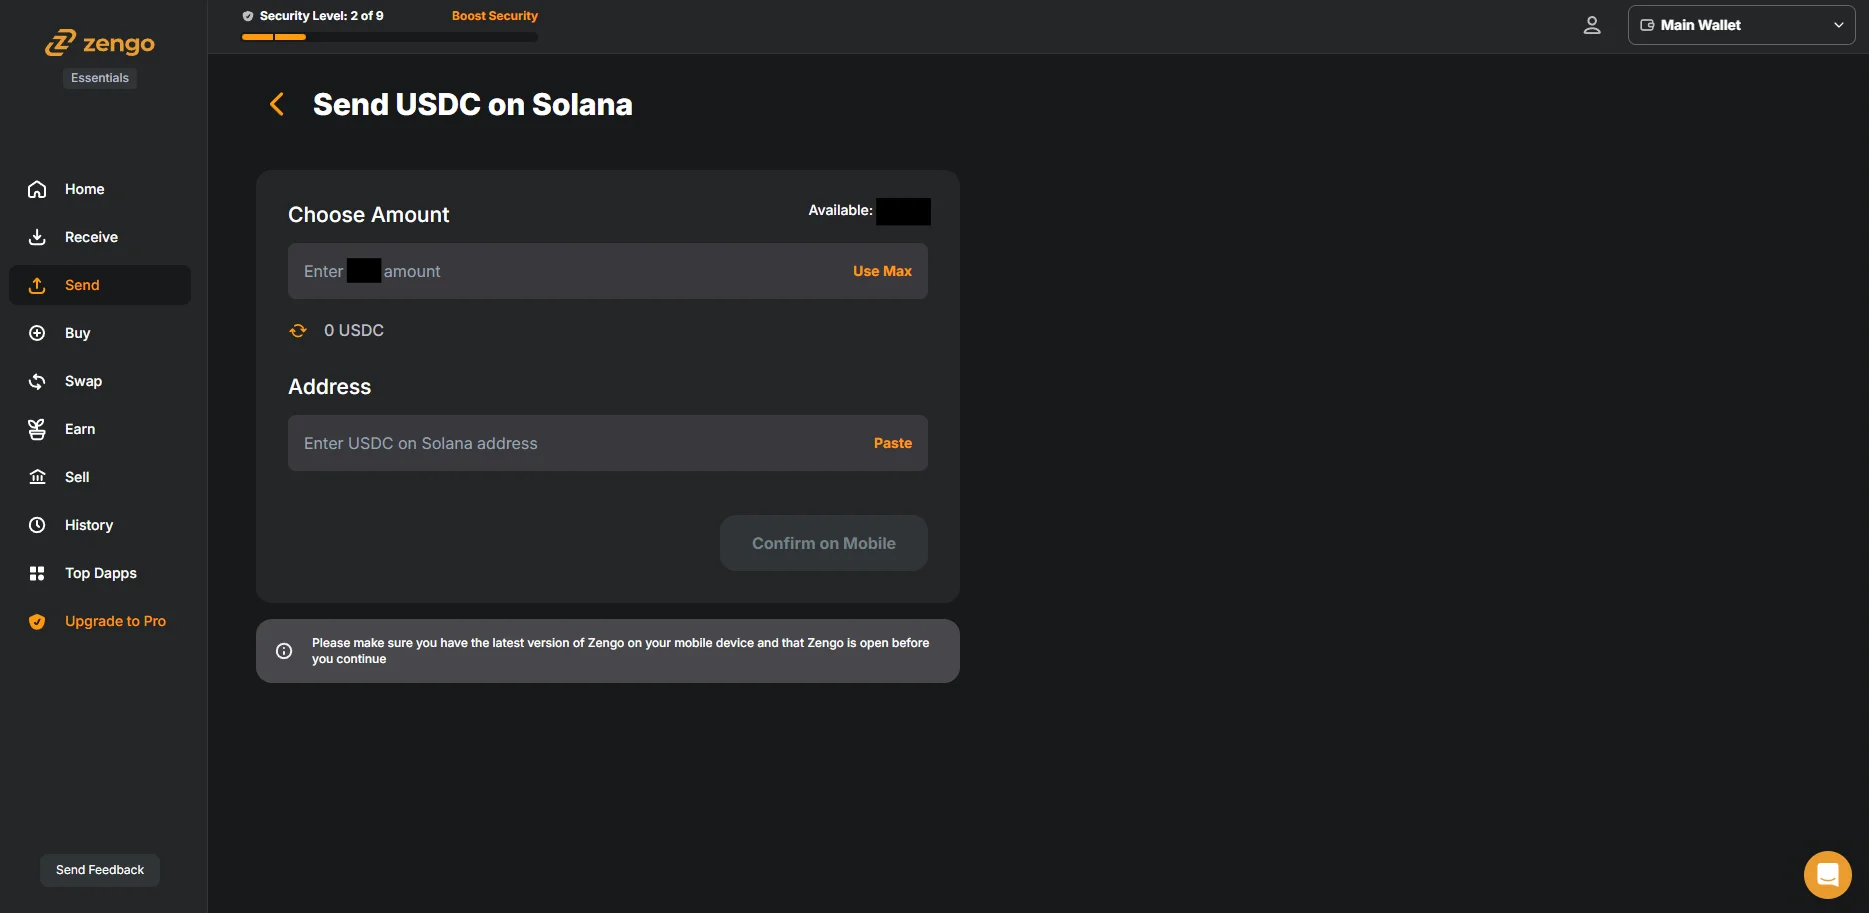
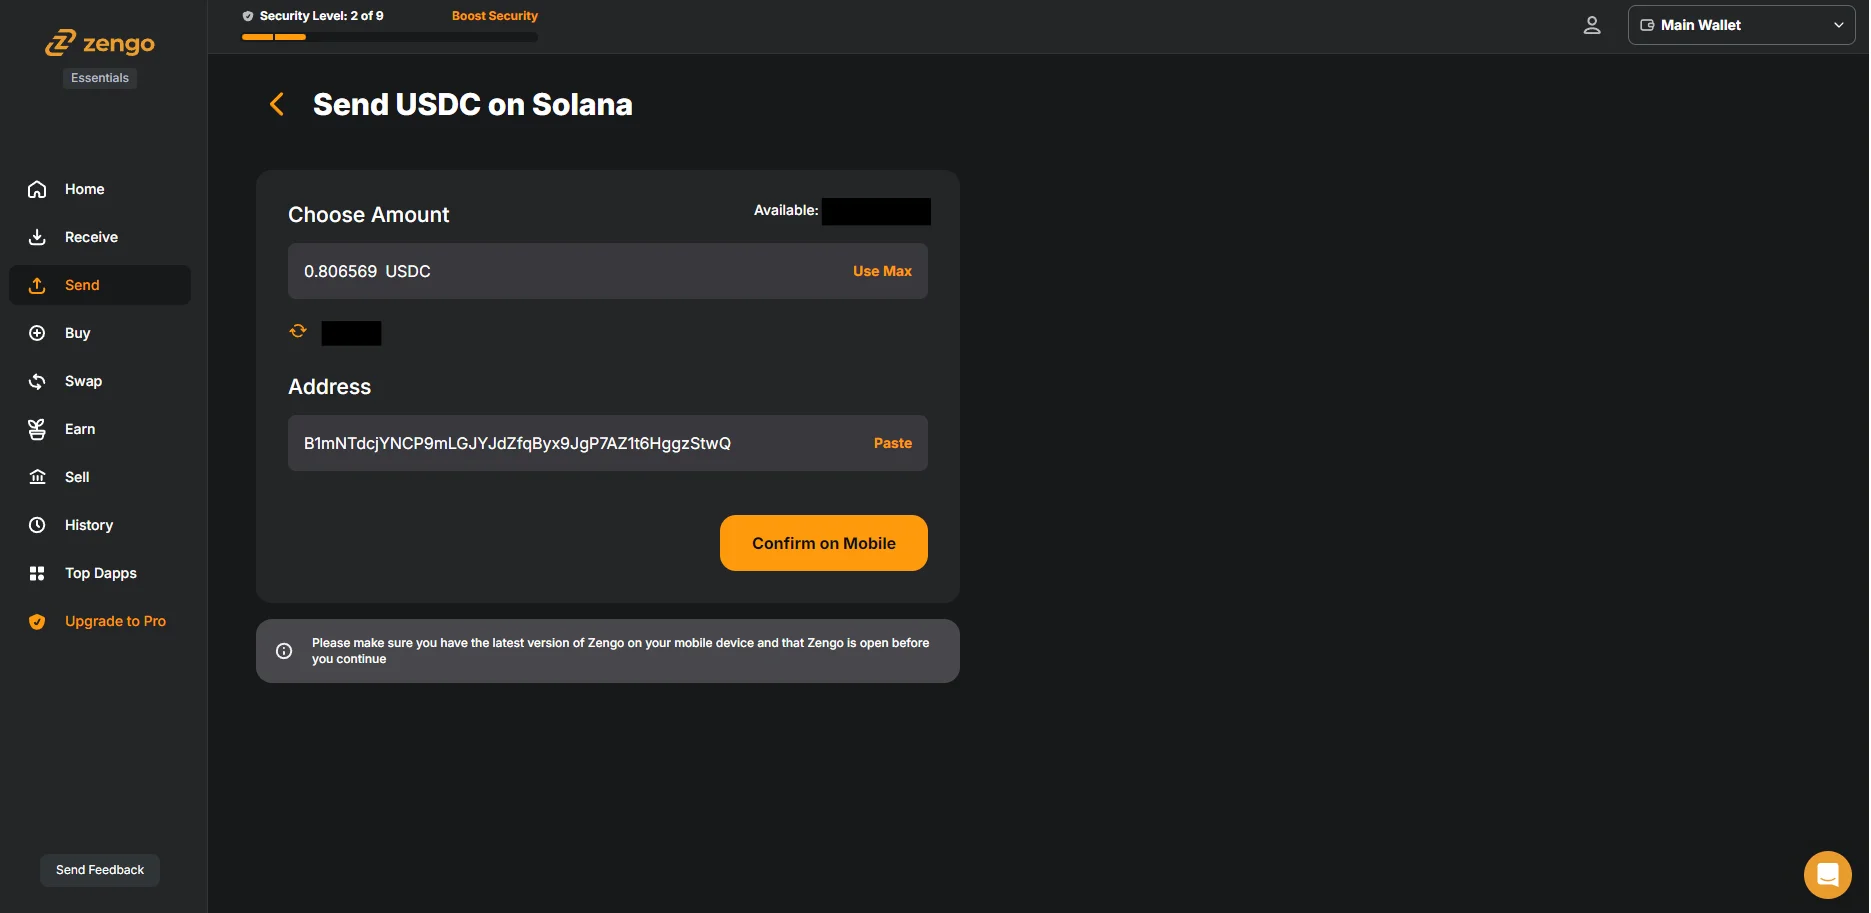
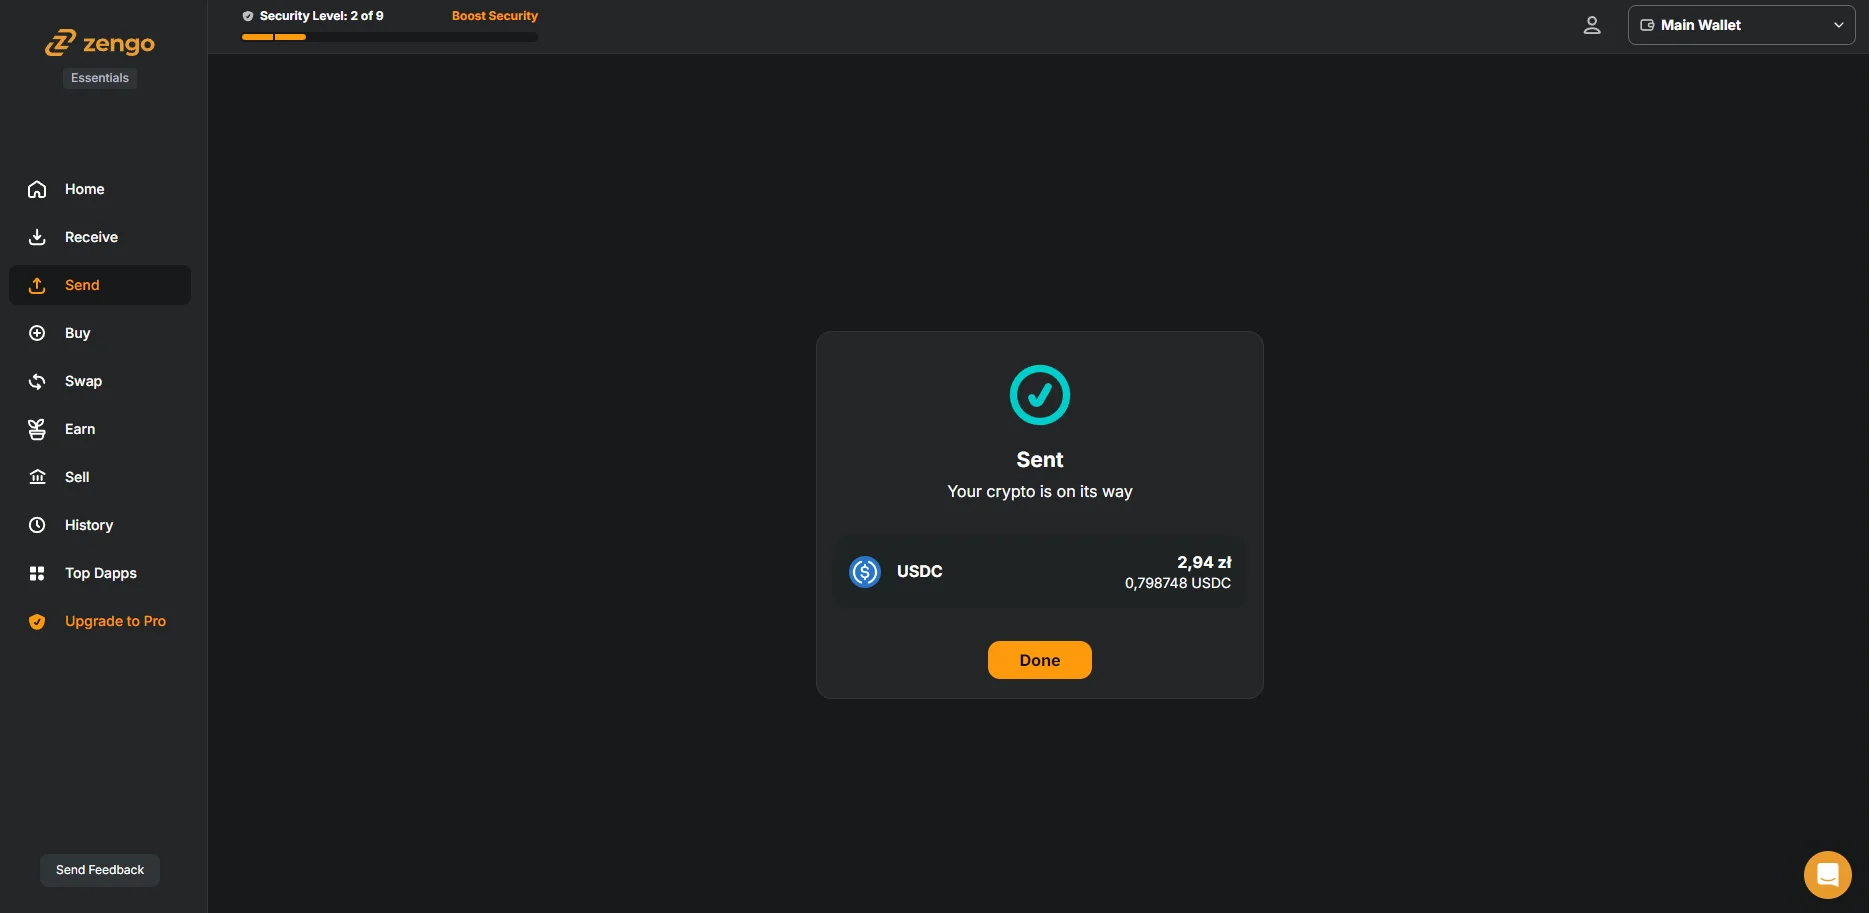
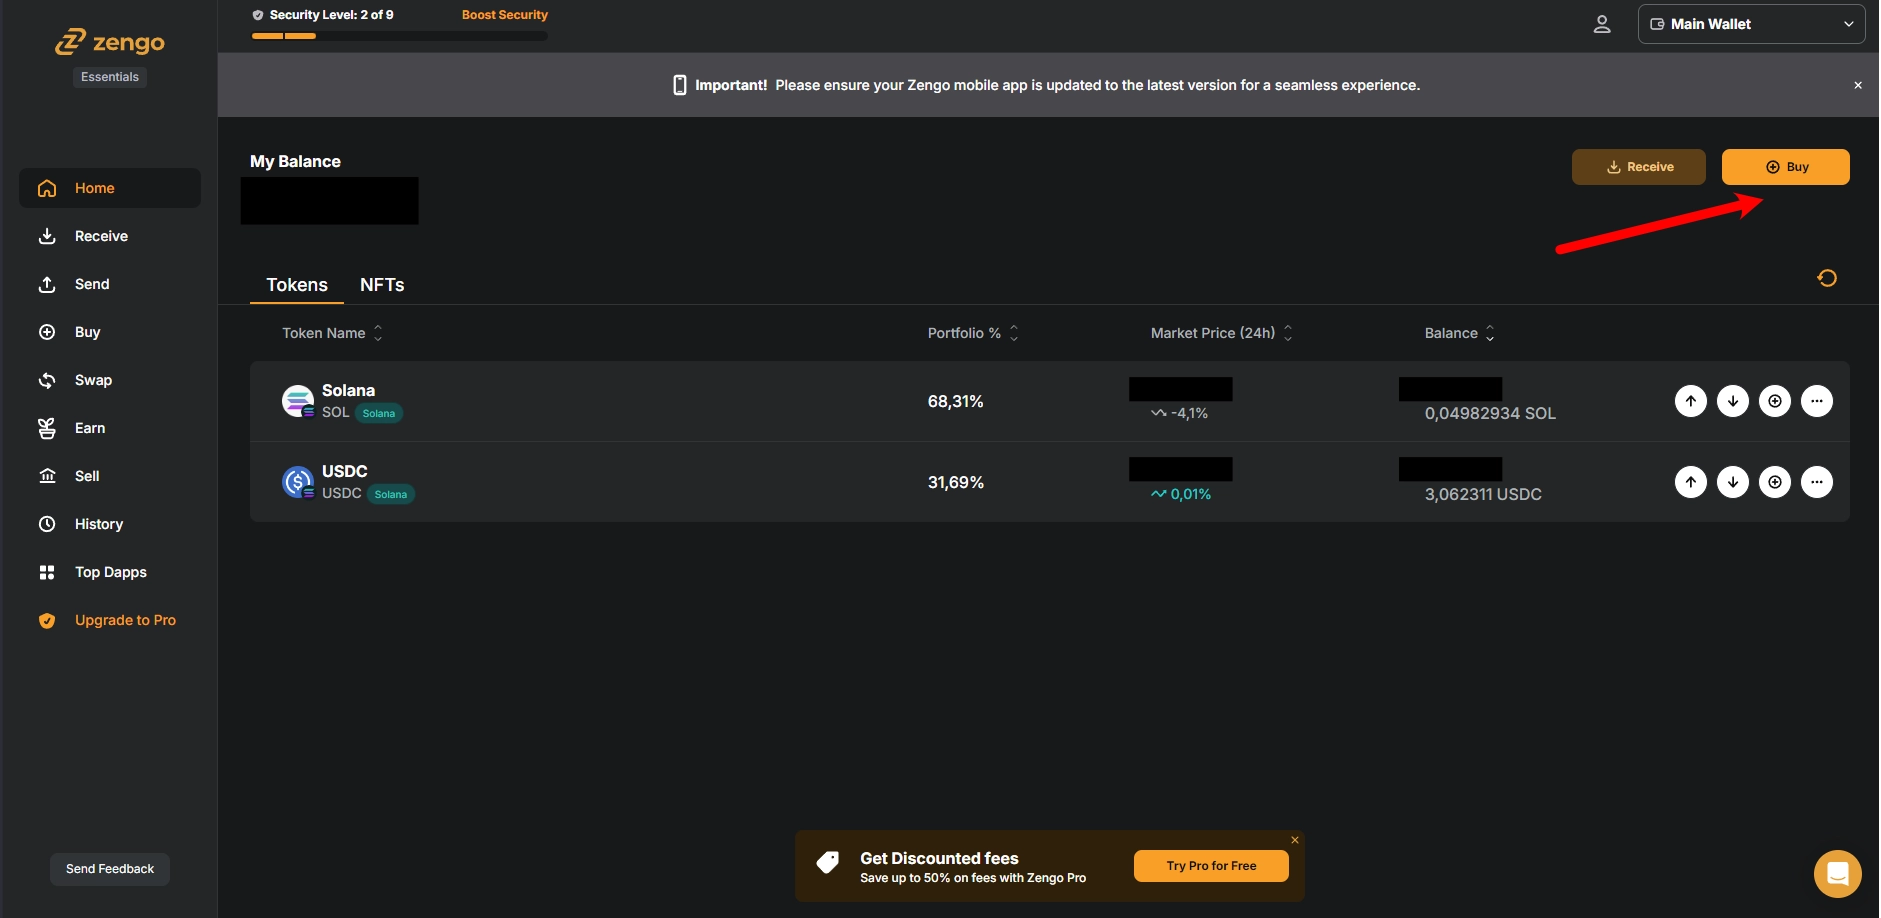
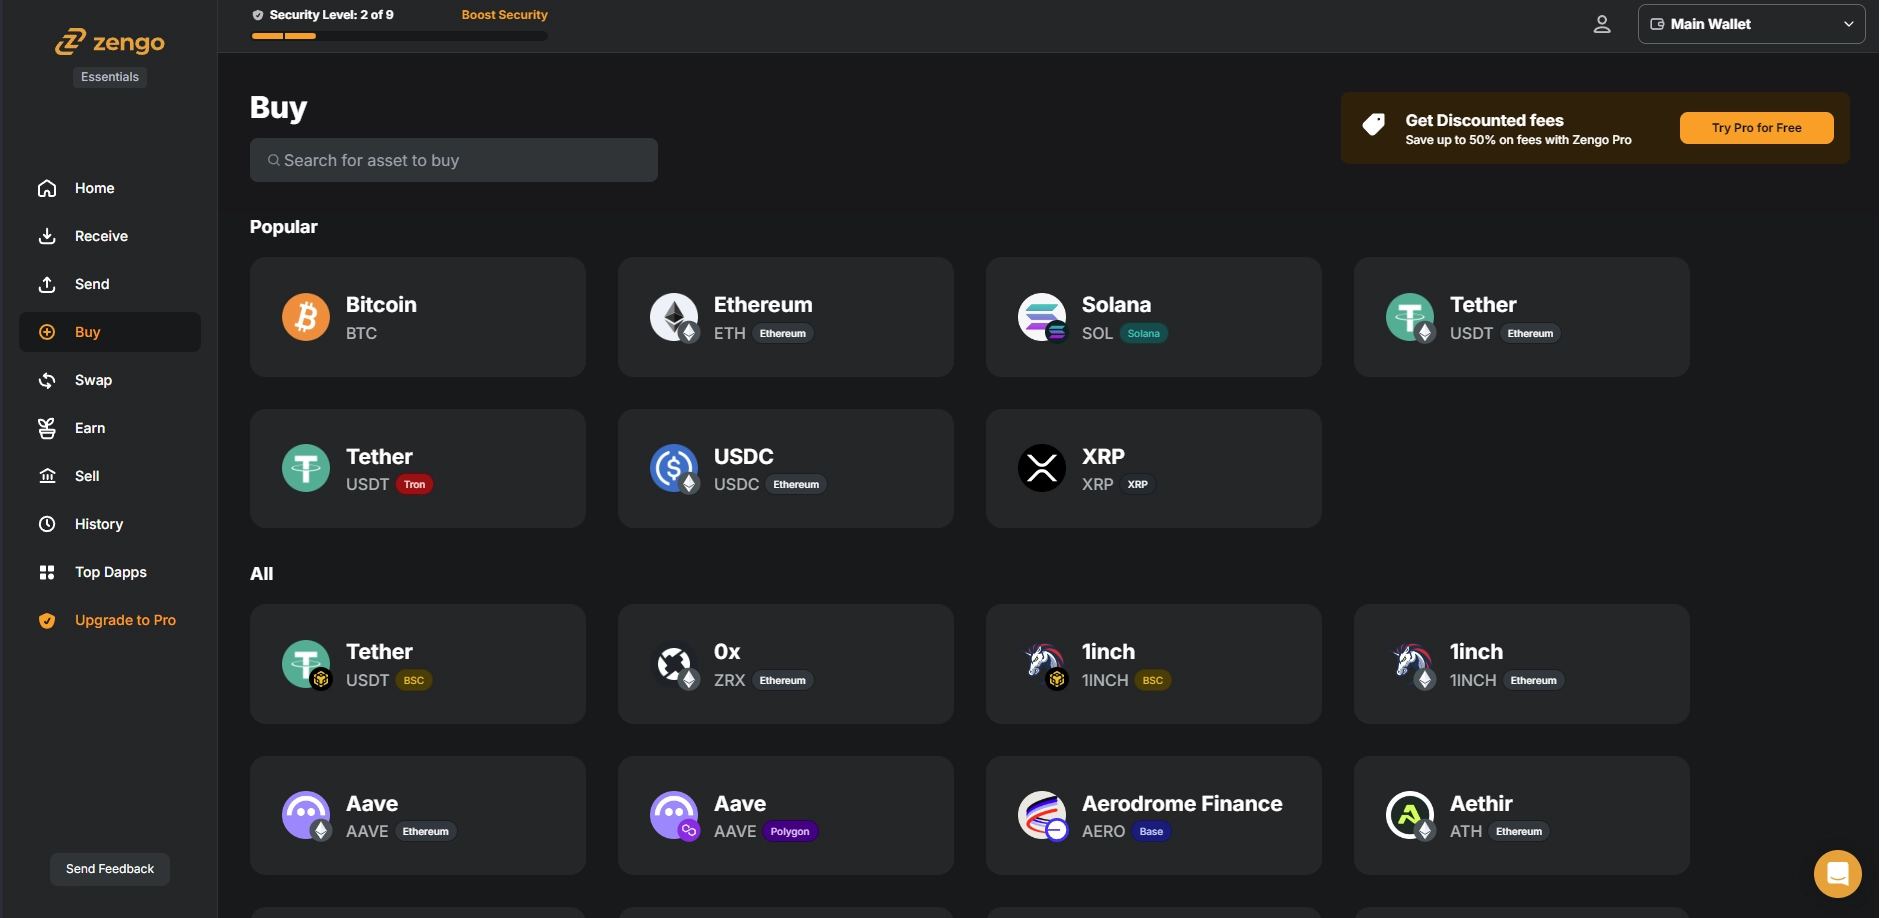
1. How to purchase crypto using wallet? Zengo example.
2. How to purchase crypto using third party on-ramp. Transax example.


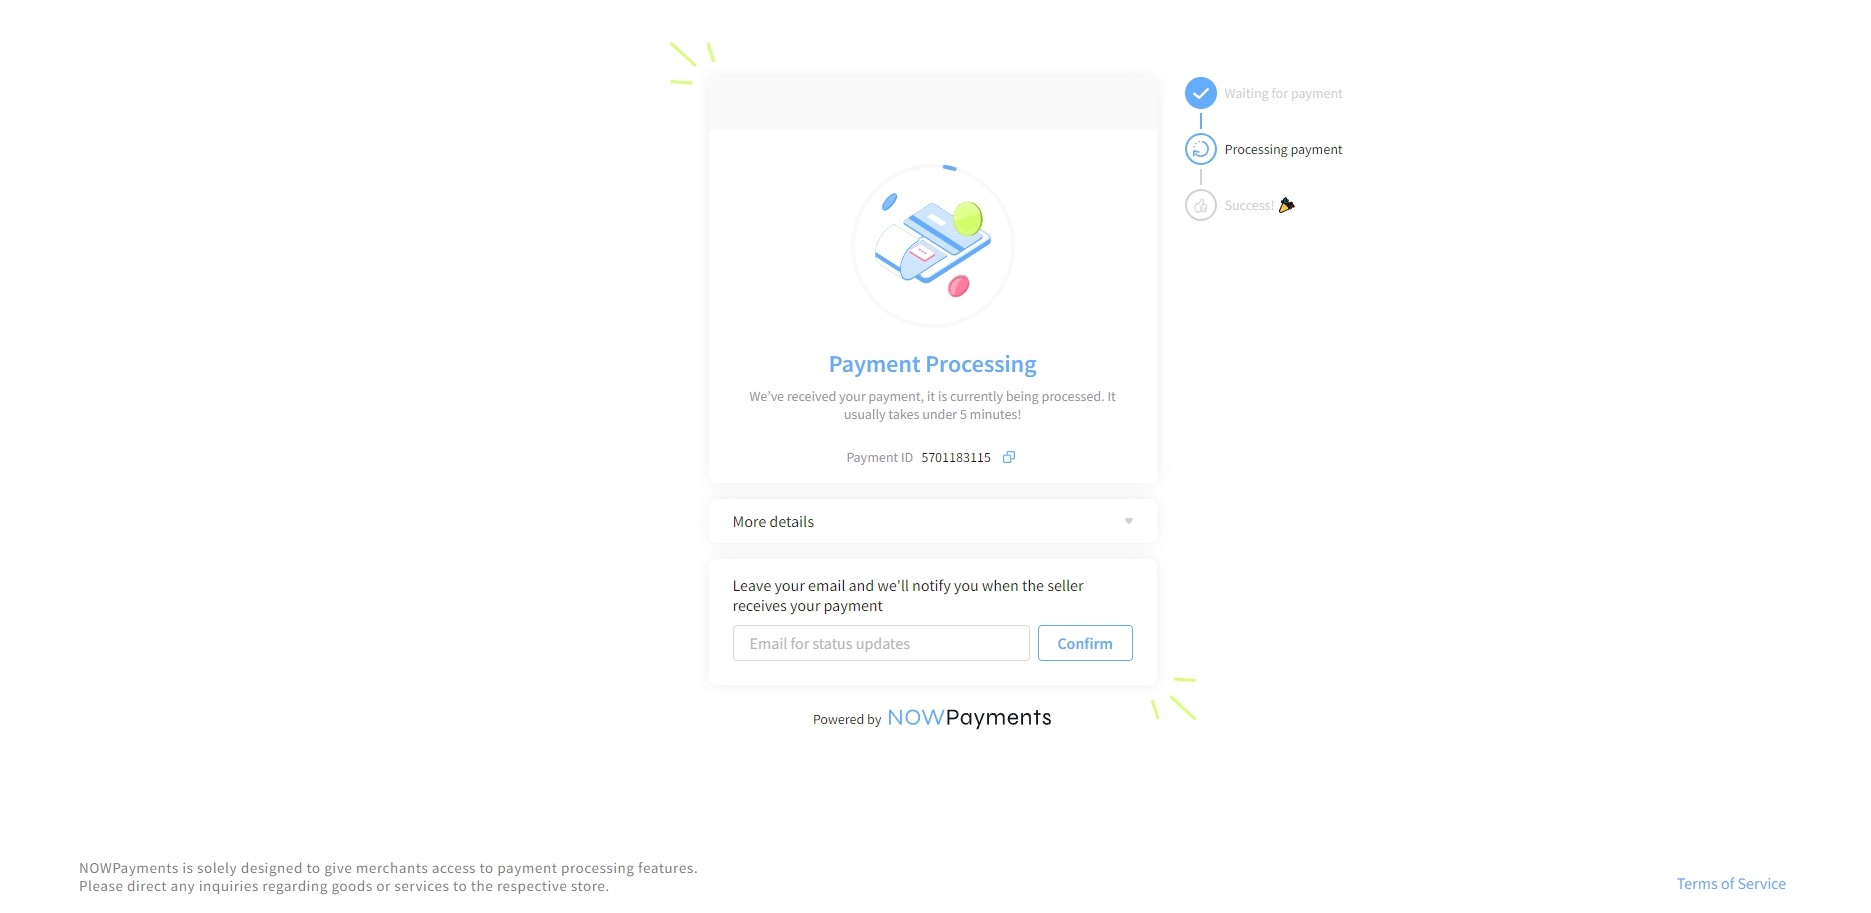
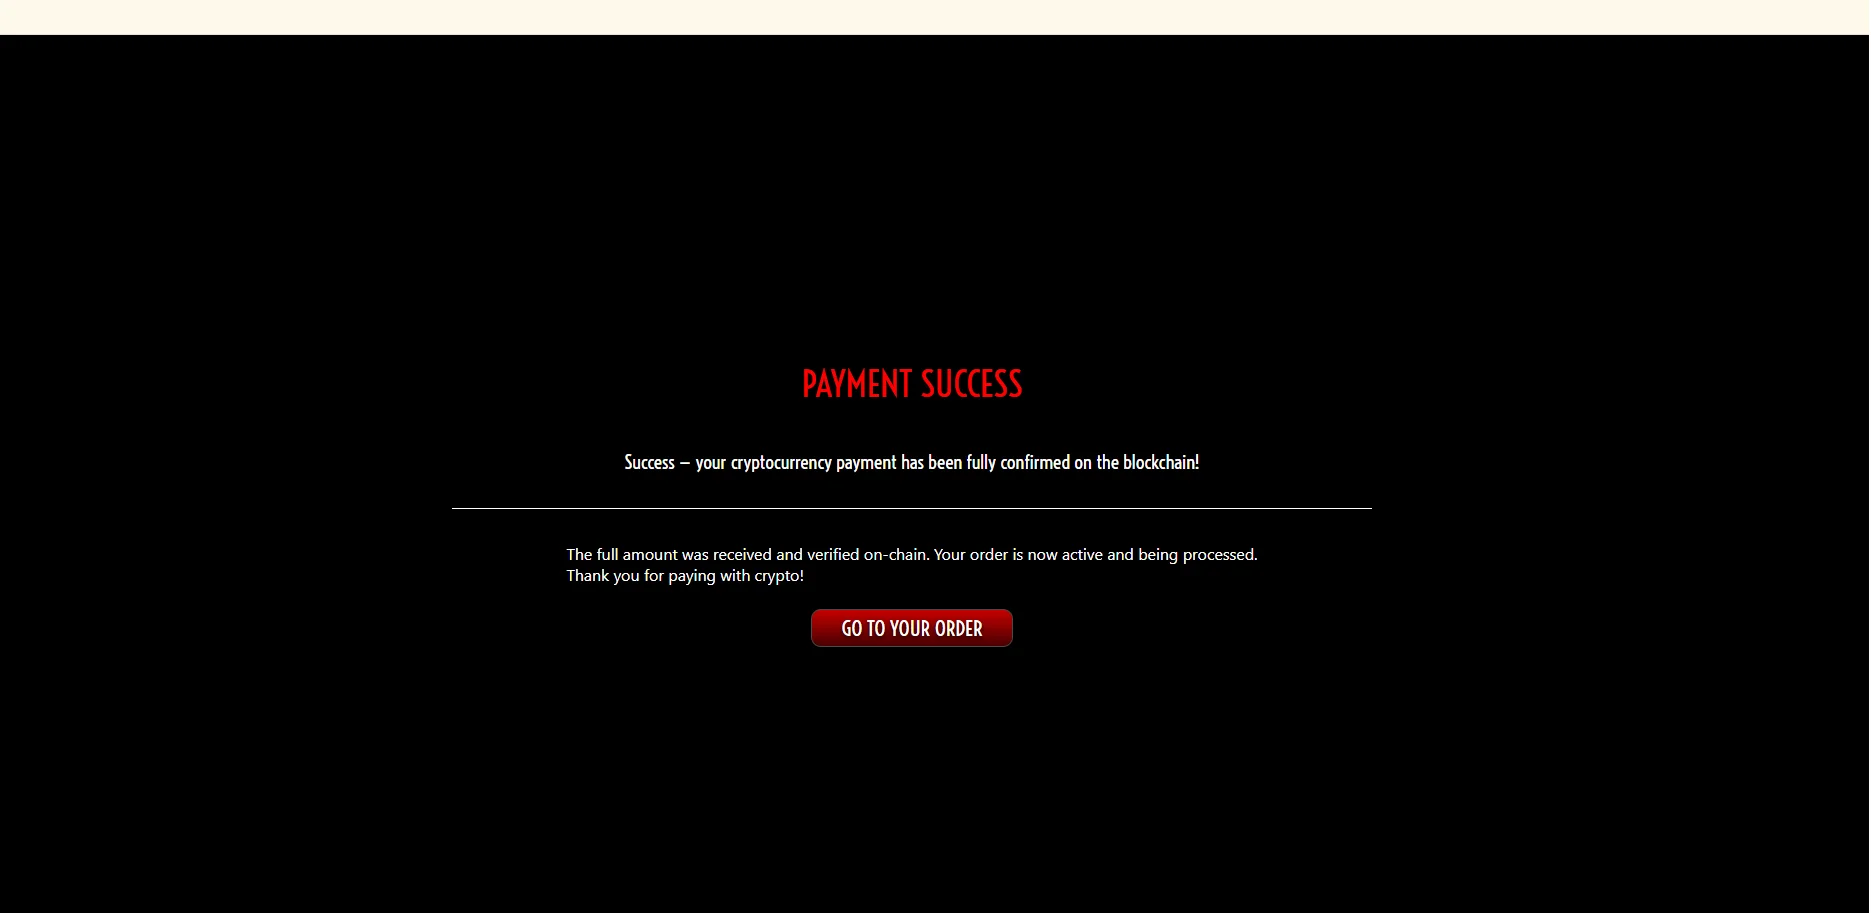
3. Purchase with crypto on our website step by step.